

After successfully breeding angelfish myself a number of times, I’ve got to say, angels aren’t the hardest to breed, but it does take some serious labor to get the fry raised up so they can be rehoused.
Breeding angelfish is really fun and extremely rewarding, but it’s quite a commitment to raise the fry.
So, today I’ll go over the ins and outs of breeding angels and raising their fry.
An Outlet for Fry
Before you start breeding angelfish, make sure that you have a solid way to rehome the fry that you breed.
Angelfish can produce a hundred babies with each spawning and each breeding pair will spawn every week and half to two weeks for several months a year.
That’s a lot of babies that will take up a lot of space and require quite a bit of care, especially the first two weeks of their lives. It’s impossible to keep them all.
I hate to think of someone starting to breed them, not having a way to rehome fry, and then flushing them to get rid of them all.
Getting a Breeding Pair
Acquiring a breeding pair is the first big hurdle to breeding angelfish.
The most surefire way to get a breeding pair is to buy a proven pair from a private breeder. This can be quite expensive, and difficult to find, especially for the more exotic varieties.
If you don’t want to lay down the money for a proven pair, your best bet is to buy a large group of juvenile angels, at least six or so, put them into a 55 gallon (208 liter) or larger tank, let them grow up together and then wait for them to pair up on their own.
It’s a good idea to get fish from several different breeders so that you get males and females that are not all related to each other. I would suggest sourcing from a few different private breeders since big box stores often use the same fish wholesalers.
The fish should be fed a varied diet of high quality flake foods, occasional baby brine shrimp and bloodworms. Good nutrition will help the fish grow more quickly and get them conditioned for breeding.
As well, I highly recommend doing 50% weekly water changes. Fish excrete hormones and pheromones into the water column that, if allowed to build up in the water, can inhibit fish growth.
An excess buildup of nitrate can also greatly stunt fish growth and negatively impact fish health. Water changes remove built up nitrate, hormones and pheromones, helping fish to be healthy and grow more quickly.
Even with excellent care, you may have quite a wait before you get a pair.
Angels don’t become sexually mature until they are at least six months old. I’ve had groups that didn’t show any interest in pairing up until they were almost 18 months old.
Most breeders sell their fish that are a few months old, so it can take a while for the fish you buy to become sexually mature and pair off.
Sexing Angelfish
When they are juveniles, males and females look pretty much identical. How I wish you could easily tell them apart at 3 months old!! It would have made my life SO much easier!
But, at least, once they’re mature, angelfish are fairly simple to sex.
First off, males are substantially larger than females. I’ve had pairs where the male appeared to be almost 50% bigger than the female.
Secondly, males have a slightly different head shape. It’s a bit subtle to discern, but once you’ve seen it several times, it becomes more obvious.
Males’ heads have a much more pronounced outward curve from their dorsal fin down to their nose.
The females’ head does curve from the dorsal fin to the nose, but it’s a completely smooth curve without the slight outward hump that males get.
Once you can identify males and females, it’s still important to wait for fish to pair up. It’s generally not as simple as putting a male and female together. Angelfish won’t just automatically breed because one of each sex is present. Some pairs of fish live together for years and will never breed.
Watch for Pairing Behavior
Once your group of fish have started to become sexually mature, you may start to see some of them display pairing behavior:
- Chasing – the pair will start to stake out a territory and will begin chasing off other fish. The pair will move away from each other to chase off another fish, but they will continually move back to be near each other.
- Picking – both fish will start to pick clean a vertical surface in the tank. They’ll do their best to clean off any algae or other gunk on it. This gives their eggs the best chance of sticking as the female lays them.
Usually when you see this behavior, it’s a safe bet that those two fish have become a mated pair, and you can move them to their own breeding tank.
Breeding pairs will need their own tanks. Yes, it’s possible for them to lay and hatch eggs with other fish in the tank, but it is incredibly stressful for the parents. And the other fish in the tank will eat the babies once they are free swimming.
Setting Up a Tank for Angelfish Breeding
Tank Size
It’s important to make sure you put your breeding pair in a large enough tank.
Some commercial breeders put each pair in a 20 gallon high tank, but I really think this is much too small unless you plan on doing water changes at least twice a week.
I would recommend putting a pair in at least a 30 gallon, but I think a 40 gallon is even better. This makes sure that you have plenty of water volume to prevent rapid and drastic swings in parameters. Plus, this gives the fish plenty of swimming room when they’re not tending eggs.
Filter
If you’re going to breed angels, I highly recommend using sponge filters, especially for fry tanks. They’re relatively cheap, easy to set up and simple to maintain.
They don’t create a huge amount of flow, which is important for fry and grow out tanks. It’s fine to use hang-on-the-back or canister filters for tanks that have adult angels, as long as the flow isn’t excessive, but tiny fry and juveniles can easily get sucked up by strong filters.
You want your baby angels to be putting their energy into growth, not constantly trying to swim against dangerous current in their tank.
Hands down, Hydro Sponge are my favorite sponge filters. I have used this brand for decades. I tend to get the pro version that has coarser sponge. They don’t get clogged up as fast as the finer sponge.
I also like that you can add on a diffuser to these sponge filters, making them much quieter than other brands.
If you need to use a canister or hang-on-the-back in a tank, I highly recommend at least adding on a sponge pre-filter to the intake. This will prevent fry from being sucked into the filter.
Heater
Angelfish originate from the Amazon where water temperatures are very, very warm.
Unless your room temperatures stay over 78°F (26°C), you will need a heater in your tank.
I have always kept my angel breeding tanks between 78°F-80°F (26°C-27°C).
I ran an extensive experiment comparing popular heater brands. Without a doubt, the Fluval E Series heaters are the best, most reliable heaters on the market. They are now the only heaters I buy.
Five of my eight aquariums are heated. Four of those have Fluval E Series heaters. And the only reason that the fifth doesn’t have an E Series is because there’s nothing wrong with the Fluval M200 that’s been in there for years. But, when I do need to replace that M200, I’ll be getting an E Series to replace it.
To see our in-depth comparison of aquarium heaters
Lights
Angelfish don’t have any specific lighting requirements. You can pretty much use whatever kind of lighting you want.
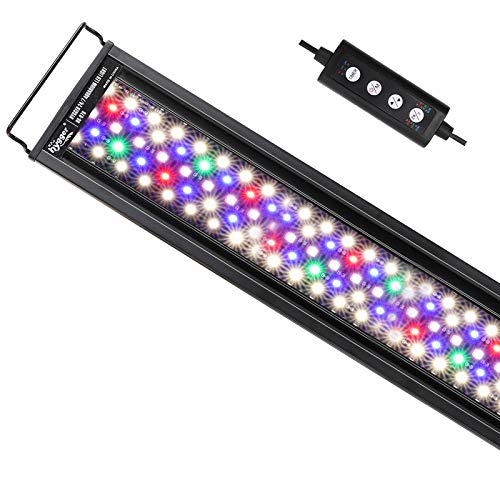
But, if you want to grow plants in the tank, I highly recommend getting some Hygger plant lights.
Yes, there are fancier, more expensive brands than Hygger. But now that I’ve been comparing lights for years, Hygger has become my favorite.
Not only do I get ridiculous plant growth, but the fish look amazing under these lights. And Hygger lights are way cheaper than a lot of their competitors.
Lid
I prefer to keep a lid on my angelfish tanks.
It helps keep the lights from getting splashed, cuts down on evaporation and helps keep heat from escaping, which saves electricity.
Also, every once in a while, a young angelfish will get a wild idea and try to jump out of the tank. It’s not often, but it does happen.
Substrate
Angels do not have specific substrate requirements. I’ve kept them on gravel, sand, inert planted substrates and even in bare bottom tanks.
I would just caution against using planted substrates that put out ammonia or nitrate unless you have prior experience with them.
Plants and Decor
OK, so you don’t have to have plants and decor for angelfish, but I recommend giving them at least something to hide behind for when they feel stressed.
When you’re growing out juveniles so they’ll pair, I would recommend giving them a fairly normal tank decor wise: plants (live or fake), rocks, driftwood and or resin decor. This gives them hiding places and can give squabbling fish a break from each other.
Some folks keep their angel pairs in almost completely bare tanks. Others keep them in fully planted tanks that look like a jungle. Both kinds of setups can be successful.
I personally kept my breeders in fully planted tanks. I think it helped reduce stress, especially while they were guarding eggs or small fry.
But, it did sometimes make catching fry more difficult. However, I felt like that trade off was worth it.
Breeding Slate
In the wild, angelfish lay their eggs on some sort of vertical surface in the water: a rock, a leaf, a sunken log, a tree root, etc.
In an aquarium, angels will lay eggs on plant leaves, filter intakes, decor, sometimes even the glass.
Most of these are very inconvenient if you want to harvest eggs or wrigglers from the tank.
A breeding slate is great for both you and the fish. Slates give the parents a smooth, angled surface that makes it easy for the female to deposit eggs on and for the male to then fertilize.
A slate can also be easily removed from the tank when you want to harvest eggs or young fry.
Slates used to be made almost exclusively of actual slate stone, but these days, you can find ones made of ceramic or even plastic.
Some people also use the ceramic cones that Discus breeders prefer.
I like these hang-on-the-side plastic breeding slates because they’re easy to put in different positions in the tank.
I also like that they’re not down on the bottom, making it easier to vacuum the substrate during water changes.

The Breeding Process
Once your pair are settled into their new tank, they will hopefully start breeding.
The expectant parents will choose a nesting site and start picking at the surface to get it free of algae.
You’ll see them start to hover around this area almost continually, leaving it only to eat.
Once she’s ready, the female will glide very close to the surface, depositing lines of eggs as she moves in an upward motion. The male will then move along the surface, releasing sperm to fertilize them.
They’ll take turns, going back and forth this way until the female is out of eggs. This process can take several hours.
It’s important not to disturb the pair while they’re in the process of laying eggs. If it’s time to feed them, but you see that they’re still laying eggs, just skip feeding them for right now, and add food later. I can tell you from experience, the parents will be very hungry after they’ve finished laying, so just offer them a snack once you see they’ve stopped laying and switched to guarding their clutch of eggs.
Sometimes, the male doesn’t get close enough the first few times the pair lays eggs, resulting in unfertilized eggs. He usually gets better after the first few attempts. Give the pair three or four attempts before giving up on them.
Hatching Eggs
Once the pair have laid their eggs, they’ll stay close to them, guarding them against any potential harm.
They will aggressively chase off other fish, shrimp or even snails that come near the eggs. They’ll go after your hand (don’t worry, they can’t actually hurt you), a net, a gravel vacuum or anything else that moves close to their nest.
Over the next few days, the parents will pick off unfertilized eggs. Unfertilized eggs will become bright white, like a sheet of paper, while fertilized eggs will remain a sort of pale yellowish milky color.
Normally, the female will eat the unfertilized eggs. This is a really good thing because the bad eggs rapidly start to break down and grow fungus that can easily spread to the good eggs.
After 2-3 days, depending on temperature, the eggs should hatch and wrigglers should emerge.
At this stage, the fry stay stuck to the surface they were laid on. They have an attached egg sac that they feed off of for several more days.
If Your Angelfish Pair Eat Their Own Eggs
Some angelfish will eat their own eggs after they’re laid, even perfectly good ones that have been fertilized.
If your fish eat their first, or even their second, batch of eggs, this could just mean that the male didn’t do a great job of fertilizing them.
Give the pair a chance to figure out how to lay their eggs properly. But, if batches of eggs keep getting eaten again and again, then you may need to pull the eggs as soon as they’re laid.
You’ll need to keep a close eye on the pair when they lay. As soon as the two stop making passes back and forth across the breeding slate, pull it out and immediately put it in another tank.
It’s best to use a small tank, something like a 5 or 10 gallon. It’s best to heavily, heavily aerate the water with an airstone, making sure that there is a strong flow of water constantly going over the eggs.
To keep down fungus, add methylene blue. This strong blue dye does a great job to cut down on bacterial and fungal growth.
Just do your best to keep it off your hands and clothes, it stains like crazy!!
You’ll need to change the water out daily. Make sure to use a dechlorinator.
Raising Fry
Fry Tank
While fry are very small, all you need is a 10 gallon (39 liter) tank. The smaller size makes it easier to make sure that the baby fish can find the food you give them.
It’s a good idea to have a separate tank set aside for raising your angelfish fry.
Most parents that don’t eat their eggs will happily raise their own fry but, if you want to speed up how often the parents will lay eggs, you’ll need to remove the babies when they’re very young.
Also, if you have the parents in a planted tank, collecting the babies once they can evade you becomes a major hassle, believe me. I once spent an entire day chasing 3 month old angels around with a net until I caught them all.
Fry tanks don’t have to be fancy. You mainly just need a sponge filter, a heater and a little bit of decor, like a fake plant so the babies have a little cover to hide around if they feel insecure.
You can make it more elaborate, if you want, but these basic elements are all you need.
Hang-on-Front Hatchery
Alternatively, for the first few weeks, you can keep your angelfish fry in a hang-on-the-front hatchery.
I’ve raised many batches of fry in this Fluval hatchery, but you do have to modify it slightly.
You attach a small air pump (sold separately!) to the lift tube on the hatchery. This pulls water from the main aquarium into the body of the hatchery. At the other end of the hatchery is a little return drain that spills water back into the main aquarium.
This drain has a small grate that’s meant to keep baby fish from swimming into the main aquarium. But, the slats on the grate are too big and newly hatched angels can easily pass through it.
To fix this, I wrapped mesh from an old fish net around the grate and kept it in place with a few dots of super glue.
I also highly recommend that you install both a non-return check valve and a control valve on the airline.
The check valve stops water from back flowing into the pump if the power goes out and the control valve lets you control how much air is going to the bubbler, which in turn controls how much water is going into the hatchery.
I like these little USB powered air pumps for the hatcheries. You don’t want too big of a pump, and these are perfect.


Feeding Fry
Feeding your baby angels is where the real work comes in. It is very important to remember that angelfish fry do not require food until they are fully free swimming!
Adding food too early can cause uneaten food to grow fungus that can kill your angelfish fry.
For the first week after they become free swimming, I recommend that you feed your baby angels three times a day. You’ll see their little bellies turn orange as they gorge themselves on brine shrimp.
Once they’re a week old, they’ll eat more shrimp per feeding, but only need to be fed twice a day.
At 3 weeks is usually when I start to introduce brine shrimp substitutes. I usually do one feeding with brine shrimp substitute and one with actual brine shrimp.
At a month old, I usually convert them over to crushed flake food. I usually still do one feeding of brine shrimp a day because I found that it gave the best growth. At this age and beyond, the baby angels will readily accept frozen brine shrimp.
Hatching Brine Shrimp
Some people recommend using powdered foods for newly hatched angels, but I disagree. Live baby brine shrimp get the attention of angel fry. I really don’t recommend powdered foods until they’re a bit older.
You’ll need to get brine shrimp hatching once the eggs hatch and you’ve got wrigglers.
It takes at least 18-24 hours for brine shrimp to hatch, so I would usually set up the shrimp hatchery 24-36 hours after the fry emerge from their eggs.
To hatch brine shrimp you’ll need:
- Brine shrimp eggs
- Brine shrimp hatchery
- Air pump
- Salt
I highly recommend investing in a quality brine shrimp hatchery.
I love the one made by V Aquavista Aquatics. I’ve hatched dozens and dozens of batches with this thing, it’s great.
You can hatch enough shrimp with this hatchery to feed four batches of angelfish fry for 2-3 days.
You do need your own empty 2 liter soda bottle. I recommend using one that is completely clear.
And you’ll need to add on an air pump. The same little pumps that I recommended for the hang-on-the-front hatcheries work perfectly for this.

I use a turkey baster to suck up brine shrimp and place them in the fry tank. Watch your fry eat and adjust how many shrimp you’re giving them at a time. It’s OK to have a few stray brine shrimp, but you don’t want too many dying in the water and fouling things.
Holding Brine Shrimp
It’s easy to hold brine shrimp for several days. I use a 2 gallon plastic container and aerate it with an airstone. This lets me keep live brine shrimp around for 2-3 days so I don’t have to hatch them every single day.
Again, those same little USB air pumps are the perfect size for this task.
After 2-3 days though, the shrimp will start to die off. Make sure to dump them out promptly at that point or they’ll start to stink.
Freezing Brine Shrimp
I like to freeze some of my excess baby brine shrimp. Older angel fry will gladly eat them, as will adult fish.
I scoop up brine shrimp with a net, then suck them up with a pipette and put them in little plastic tubes with lids that are made for freezing brine shrimp. It’s really easy. The tubes even come with a little organizer box.
Once I’ve filled up what I want, I just put the whole thing in the freezer for use later.
When I want to feed the frozen shrimp, I just float one of the tubes in the tank for a few minutes, and then dump the brine shrimp into the water. It’s super easy.

Brine Shrimp Substitute
Some breeders swear by brine shrimp substitute as a first food, but I really do not. It’s great when the fry are several weeks old, but when they’re itty, bitty, powdered foods don’t draw their attention the way that live foods do.
I recommend waiting until the fry are at least 3 weeks old before you start trying to offer commercially prepared foods instead of live foods.
Water Changes
I can’t stress enough how important water changes are when you are raising fry. I highly recommend at least two 50% water changes per week. Even more if you’re using small tanks.
This will keep nitrate low, replenish minerals and get rid of the hormones in the water that can inhibit fish growth.
Growing Out Angelfish Fry
Don’t keep your angelfish in crowded conditions as you’re growing them out.
After they’re about 2-3 weeks old, they’ll need to be bumped up into grow out tanks. 40 gallon tanks work best, but will only be sufficient for a month or so. You’ll then need to divide your crop of babies between several 40 gallon tanks as they grow larger.
Keeping too many young angels in a tank that’s too small will result in bent fins and poor water conditions.
Make sure to stay on top of water changes. It will help keep the water parameters in check and will help speed growth.
Culling Fry
This is a hard subject to talk about, but if you’re going to breed fish, you’re going to have to cull.
It’s inevitable that you will have fish with poorly shaped fins, bent spines or other defects.
If you have fish that need to be culled, I recommend that you put them in a small container of water and add several Alka-Seltzer tabs to the water. The CO2 that the tabs put out will quickly and humanely kill the fish.
Just make sure to leave them in the water for several minutes to make sure that they’re completely dead before you dispose of them.
Is Breeding Angelfish Right for You?
Breeding angelfish is really fun, but it’s also a whole lot of work and takes up quite a bit of room.
Look, it’s not for everyone. There’s no getting around hatching live food for them, in my opinion, and you’ll need to do quite a few water changes to keep them healthy and growing well.
I don’t want anyone to get halfway into this venture, only to find themselves completely overwhelmed by how much care the fry require.
But, if you have the time and inclination, I find breeding angelfish to be extremely rewarding.
I especially liked when they would first start to look like angelfish, instead of just little tadpoles.
And watching their colors start to come in was really neat, too.
I hope you find this article helpful.
I wish you and your fish the very best!
